Showing posts with label ReDux. Show all posts

Saturday, February 20, 2016

Soft Seedy Breakfast Bar {ReDux}


It felt like this month's theme Break Out of Breakfast Boredom was right on point for me. I've been playing around with a few different breakfast just for fun and to see what our daughter would like. I had tried a few bars, so that was an easy choice for my recipe. I was inspired by a Canadian lentils/Pulse Canada kid recipe as well as ones from the lean green bean and Oh She Glows.

I wasn't feeling bored with breakfast, but I typically like to try different ideas to discover new favourites, have recommendations for others, and just because I enjoy spending time in the kitchen. I do love breakfast as well!

The Redux theme description we were challenged with was: Cooks aren’t always pressed for time in the mornings – they just need new ideas. Think mug cakes, smoothie bowls, breakfast cookies and more. Show us the healthy way you wake up your breakfast – or wake up just for breakfast!


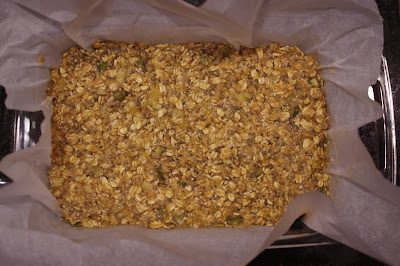
I like breakfast to be nutritionally dense and usually include some kind of protein and fruit with mine. Our daughter hasn't tried many nuts and seeds yet due to her lack of teeth, so I thought a soft breakfast bar would be a good place to start. I even worked on these first thing in the morning during the week.

Soft Seedy Breakfast Bar
Makes 12 bars

Ingredients
1 1/2 cups rolled oats (I used large flake)
2 Tbsp hemp hearts/seeds
2 Tbsp chia seed
2 Tbsp sunflower seeds
2 Tbsp pumpkin seeds
2 Tbsp sesame seeds
1/4 tsp salt
1/2 tsp cinnamon
2 ripe bananas (about 1 cup), mashed
1/2 cup cooked red lentils
1/4 cup peanut butter
1/3 cup honey
1 tsp vanilla


Directions
1. Preheat oven to 375F.
2. Line a rectangular pan (I used a 7" x 11" one) with parchment paper. 
3. In a large bowl combine oats, seeds, salt and cinnamon. In a separate bowl, combine lentils and bananas, set aside. 
4. Melt peanut butter and honey in a saucepan over medium heat until smooth and softened. Remove from heat and stir in vanilla. 
5. Combine oat and seed mixture with lentil mixture. Slowly stir in peanut butter/honey until well combined. 
6. Spread in pan and press firmly. Bake for 20-25 minutes until starting to look golden brown. Cool completely and cut into 12 bars. 


I was surprised how soft the bars stayed. They're not overly sweet and our little one seems to enjoy them too.

Happy Sunday and enjoy your breakfast! Don't forget to check out the links below for more ideas/recipes.

Cheers,
Steph Langdon, RD
www.nutrishus.com


An InLinkz Link-up

Thursday, January 21, 2016

Mac & More {Recipe ReDux}

My recipe testing for this week didn't go as planned. I fell ill on the weekend and thus fell behind on my week. I was inspired to try nutritional yeast, but since it's a new ingredient to me, I wasn't even sure where to start. I went to the closest health food store and had to ask, but they did have it. Since I was running short on time, I purchased it. When I got home, I realized that the brand I bought doesn't say much about its nutritional value beyond the standard nutrition facts panel, so I was a little disappointed. Some nutritional yeasts are fortified with vitamin B12, and it can be a good source of B vitamins, but all I can really tell about mine is that it's an excellent source of iron and relatively high in protein and fibre. I feel that a little marketing could go a long way on something like this. I prefer food over pills and powders and there are many ways to up the nutritional value of your recipes with items like nutritional yeast, but many people don't know what it is. It has many uses so I am excited to continue to play with it in my kitchen.

You may be wondering, but I was looking for a new ingredient, because this month's theme was A New Ingredient for the New Year: Pick a new ingredient that you’ve been wanting to try… and cook or bake up a new recipe in the new year. Show us how you’re cooking with something new (to you!) in 2016.
There are quite a few ingredients I have yet to play with and I look forward to seeing the other posts (see links below). I was inspired because we're continuing to introduce foods to our 14 month old, who did love most things and is gradually becoming pickier. I also mentioned squash mac and cheese to my kd loving husband and he was skeptical, so I though the cheesy taste of nutritional yeast would be a good addition to an attempt at squash mac and cheese.  Our daughter already loves cheese, but veggies can be a harder sell, perhaps until she has more teeth and can enjoy them raw too, so I also wanted to add some red pepper for extra flavour and nutritional value. It was a rushed week, so feel free to let me know if you'd tweak the recipe and I know the photos aren't my best (shot mostly at night). My husband approved it, so that was a good start!
Mac & More
Serves 4-6

Ingredients
1/2 red pepper, washed, cut in half
1 medium butternut squash, washed, peeled, and cut into 1-2 inch cubes
1/4 - 1/3 cup onion, I used 1 small white, washed, peeled, and roughly chopped
1 tsp olive oil
salt and pepper
340g small pasta (I used whole wheat macaroni)
2 Tbsp butter
2 Tbsp all purpose flour
1 cup milk (I used 1%)
4 Tbsp nutritional yeast
salt and pepper

Directions
1. Heat oven to 425F. Line a baking sheet with aluminum foil and spread red pepper (I roasted the whole pepper), squash and onion, drizzle with olive oil and a dash of salt and pepper. Roast for about 30 minutes, until the red pepper is slightly charred. Set aside to cool.
2. Cook pasta according to directions. Drain and set aside.
3. Combine butternut squash (you want 1 cup pureed) with red pepper in a blender until smooth.
3. Meanwhile prepare your roux: Heat a saucepan over medium heat. Melt butter, whisk in flour until combined. Slowly add in milk, continually whisking until smooth. Add nutritional yeast, salt, and pepper (to taste). Continue to whisk until thickened. Add the pureed vegetables and stir to combine.

  4. Mix in pasta until coated.
5. Serve immediately. Option to garnish with shredded cheese and/or parsley.

Cheers,
Stay well and get adventurous with new ingredients!
Steph Langdon, RD

Saturday, November 21, 2015

Choco-Bean Zucchini Loaf {ReDux}

It's been a 'busy' month due to a quick family holiday and our little girl's first birthday. I only looked at this month's theme earlier this week, so it was a bit of a rush to try to get it all together - where did November go?


The theme was Creative Quick Breads: The holiday baking season is upon us. And this month we’re going way beyond grandma’s banana bread. From sweet to savory and whole-grain to gluten-free, show us your new quick bread creation fresh from the oven. And if you have a tip for wrapping and giving your lovely loaf, please share that too!

I have heard the term, I've seen it in cookbooks, but quite honestly, I looked it up first to make sure I was on the right track! Webster's defines quick bread as "bread made with a leavening agent (as baking powder or baking soda) that permits immediate baking of the dough or batter mixture" - so, many things fit into this category.


As I often do, I considered what I already had in the house, thus I landed on zucchini, as I haven't used it in baking even though it's a common moisture enhancing ingredient. I have also been thinking about trying black bean brownies (another fairly common one these days), so I landed on chocolate and black beans. I still wanted to make a loaf, as that was what I first considered with "beyond grandma's banana bread". So here is my November creation - don't forget to check out the collection below. I did attempt to see what my Vitamix could handle, but have changed the directions since it wasn't powerful enough for all the dry ingredients I attempted (lesson learned). It is a fairly dense loaf, but moist and flavourful without being too sweet. My husband said that it looks like a giant Clif bar, and I know it isn't the most beautiful loaf I've ever seen.


Choco-Bean Zucchini Loaf
Makes 1 loaf

Ingredients
1 - 540 ml (about 18 oz) can of black beans, rinsed and drained
2 eggs
1/3 cup canola oil
1/2 cup cocoa powder (I like camino)
1/2 tsp baking soda
1/2 tsp baking powder
1 tsp vanilla
1 2/3 cup white flour
1/4 cup brown sugar
1/4 tsp salt
1/2 tsp cinnamon
1/2 tsp espresso grounds (optional)
1 cup zucchini, grated/shredded
1/2 cup semi-sweet chocolate chips


Directions
1. Grate or shred zucchini, I used my food processor to make quick work of it. Preheat oven to 350F and lightly grease a loaf pan.
2. Combine beans, eggs, oil, and cocoa in blender until smooth.
3. Combine baking soda, baking powder, vanilla, flour, sugar, salt, cinnamon, and espresso in a large bowl.
4. Fold in bean mixture.
5. Add zucchini and chocolate chips.
6. Spread into loaf pan. Bake for 45-50 minutes until a toothpick comes out clean. Cool on a rack for 2-5 minutes before removing from pan. Serve warm or room temperature.


Other quick breads I considered were biscuits or scones as I do love breakfast items or those that go well with tea or coffee.


Stay warm,
Steph Langdon, RD


Wednesday, October 21, 2015

Energizing Muesli {Recipe ReDux}

With seasonal changes and festive holidays, I have a lot of recipes in mind and a few new ones that I've tried lately. We often experiment in our kitchen (which can be a hit or a miss!). This month's Recipe ReDux challenge was A Nutty Nut Day: We had to take advantage of the fact that National Nut Day (October 22nd) falls on one of our ReDux monthly theme post days – so we can all go nuts! Share a healthy nut-filled recipe: Think whole nuts, chopped nuts, ground nuts, nut butter and/or nut flour. And Happy Nut Day!


So, tomorrow is Nut Day! There are so many food holidays to celebrate, and I do try to if I know of them. When I thought nuts, I originally tried to think of something my daughter could eat as well. She's only 11 months old and has two teeth. She has tried many foods and seems to love them all, which includes peanut butter. However, since nuts are a hard texture, I'm waiting for more teeth before I give her too many more varieties. Instead, I chose to go with a muesli recipe. We make granola from time to time for a quick breakfast with yogurt and fruit. So I figured I would mix it up and make muesli instead. It doesn't take much to make a hearty, nourishing breakfast since nuts, seeds, and dry fruit are nutritional powerhouses, but also high in calories.


I used ingredients I had on hand, as well as a few that I felt were right for fall. The recipe is also open to interpretation and can easily be altered. It is something that will help get us through the morning, is easy to put together, and can be enjoyed in a variety of ways. I'll enjoy it as a form of overnight oats, simply with yogurt/fruit, as topping to a smoothie bowl, and I might try it warm as well (since it is getting colder outside).


Energizing Muesli
Makes 10 servings (1/2 cup each)

Ingredients
2 1/4 cups large flake rolled oats 
1 cup unsalted nuts, roughly chopped (I used 1/3 each almonds, pecans, and walnuts)
1 cup dried fruit, roughly chopped if necessary (I used 1/3 each apple, cranberries, and apricots)
1/2 cup seeds (I used 1/4 cup each raw sunflower and pumpkin)
1/4 cup coconut flakes
2 Tbsp hemp hearts
1 Tbsp chia seed
1/2 tsp ground cinnamon

Directions
Chop ingredients if needed. Combine in a bowl. Store in a well sealed container.

In continuing with my October gratitude theme, 
I am grateful for: being allergy free, so I can enjoy foods like nuts


Go nuts with the recipes below!
Steph Langdon, RD

Sunday, September 20, 2015

Fall Freezer Muffins {ReDux}

September is often a month to get reorganized and 'fall' back into routine. We've had a mix of cool/rainy weather and warm/sunny weather which has affected what I've been inspired to cook. I find that I start making more soups and using my crockpot more often as the temperature comes down. The Recipe ReDux theme this month was also along these lines: Fantastic Freezer Meals:
Share your tips and tricks for making one – or more freezer meals. It’s the end of the gardening season for some of us; let’s store away that produce in heat-and-eat-from-the-freezer-meals. Show how convenient healthy freezer breakfast, lunches or dinners can be!

My time in the kitchen can still be hit or miss since our little one is 10 months old and I try to get my work in while she sleeps. I ended up baking my recipe in the evening just to be able to fit it into my week. This is a good reason to cook in big batches and freeze! Based on a recent Saskatchewan food tour (which I plan to blog about soon), I was inspired to try to use some ingredients that come from our local commodities (eggs, flax, canola, lentils) in this recipe as well as fall flavours like pumpkin, apple, carrot, and spices. These can be a quick snack or part of breakfast on the way out the door (if necessary). They are hearty and full of all kinds of goodies. If you're lucky, you may even have some garden carrots or a pumpkin patch to use for your ingredients.

Makes 12 muffins
Ingredients
1/4 cup split red lentils, drained
1/4 cup large flake oats
1 cup water
1/2 cup all purpose flour
1/2 cup whole wheat flour
1/4 cup brown sugar, packed
2 Tbsp ground flax
1/2 tsp salt
1 Tbsp baking powder
1/2 tsp baking soda
1/8 tsp each, cloves, all spice, nutmeg, and ginger 
1 tsp cinnamon, ground
1 egg
3/4 cup canned pumpkin
3 Tbsp canola oil
2-3 carrots, grated (about 1 cup)
1 apple, diced (I used fuji)
1/3 cup walnuts, chopped
1-2 Tbsp pumpkin seeds, raw

Directions

1. Combine lentils, oats, and water in a sauce pan. Bring to a boil and reduce heat; simmer about 8 minutes.
2. Preheat oven to 375F. Line muffin tin with paper liners or spray with oil.
3. Meanwhile, combine dry ingredients (flours, sugar, flax, baking soda, baking powder, salt, and spices) in a medium bowl.
4. In a large boil, combine egg, pumpkin, oil, and the lentil/oat mixture (with any remaining water).
5. Add the dry ingredients gradually to the large bowl with the egg mixture. Stir just until combined. 
6. Add carrots, apple, and walnuts. Stir to distribute. Top with pumpkin seeds.
7. Bake for 20-25 minutes until a toothpick comes out clean. Cool for a few minutes before removing from pan. Cool completely before freezing. 
*I usually freeze muffins in groups of 2 or 4 as that is how we tend to consume them. I don't mind muffins from frozen because it's nice to heat them up before eating anyway. Defrost in fridge or in microwave. Follow these instructions from Quaker Oats if you would like more detail on freezing and thawing muffins. 
See below for other freezer meal/snack ideas and comment to let us know your own!
Stay warm and enjoy the changing colours of the season!
Steph Langdon, RD
www.nutrishus.com


Friday, August 21, 2015

Beefed Up Hamburger Soup {ReDux}

The nights have definitely been cooling off, the Canadian geese look like they're getting ready for a journey south and my iced coffees are now just coffee - yes it's 'back-to-school' time for most people. I have a few teachers in my life, so it's back to work for them too. 
I often feel that September is a time to get back in the kitchen, get back into activities, and get re-organized as lake time comes to an end. The ladies at the Recipe ReDux were thinking the same things, since this month's theme is:
Back to the Dinner Table - After the hustle and bustle of the holiday/vacation season, August is the time many families get ‘back to routine.’ Show us your favorite recipe to help families get ‘back to the dinner table.’ It might be a favorite family recipe from your childhood that you’ve ReDuxed; or maybe it’s your family’s current favorite. Let’s all gather back at the table!

Right away I thought of big batch cooking, as I prefer to prep and cook once and eat multiple times when things get busy, or freeze some for a later date. Perhaps family members will have to eat at different times, or maybe a big batch is the way to sneak in a sit down family meal. Since I also had family on my mind, I decided to tweak one of my mom's recipes. As I said, it's getting colder here, so I'm more open to warm dishes like hearty soups.
I started with my mom's hamburger soup and added lentils and a more few vegetables to 'beef it up". I also thought it was funny that I 'beefed it up" by adding lentils! This way I feel like soup can become a meal and I find it's a great way to get more vegetables in, or even to use up your garden goodies. I used ground beef, but I'm sure you could use chicken or turkey as well. I also usually make it on the stove (as a one pot meal), but I'm sure I successfully made the original version in the slow cooker once too.
Beefed Up Hamburger Soup

Ingredients
0.5 to 1.0 lbs of lean or extra lean ground beef
1 medium onion, diced
28 oz (796 ml) can diced tomatoes, no salt added
3 medium carrots, diced
2 zucchini, chopped
2 stalks celery, diced
1 red bell pepper, chopped
1/3 cup barley, rinsed
1/2 cup dry green lentils, rinsed
1/2 tsp thyme
1/4 tsp cayenne pepper
2 bay leaves
3 cups of water
4 cups of beef broth/stock
salt & pepper to taste

Directions
1. Heat a large pot over medium heat. Brown the meat and cook the onions (3-5 minutes), drain fat.
2. Add the rest of the ingredients (nice and easy). 

3. Bring to a boil. Simmer for at least 1.5 - 2 hours, stirring often.

I did have a little 'help' in the kitchen this month too!

Eat up,
Steph Langdon, RD
something nutrishus


Tuesday, July 21, 2015

Bruschetta Salad {ReDux}

July 21 and I'm ready with my ReDux post! For once, I was actually organized (I typically am, this mom thing just makes things harder!). This month's theme was Fresh from the Garden -The season of bountiful produce has arrived. Whether your produce comes from the Farmers Market, a CSA share, or a plot of dirt out back, show how you are using fresh July fruits or veggies. And if you have gardening successes – or failures – please share!
We just moved into our house in June, and the yard will likely be next year's project, so I don't have a garden of my own. I'm also not sure if I have a green thumb, but I have some in my social circles (hence the garden fresh basil in this recipe - thanks Jolene!). I have been enjoying Canadian grown summer fruit (cherries, nectarines) and picked fresh Saskatoon berries at our lake, but right away, my thoughts went to tomatoes for this post.
I love a good, garlicky bruschetta, but I also enjoy salads this time of year - I mean, do you really want to heat up the house with the stove?! So, a combo was my end goal. I made croutons, which I usually don't, because I think of bruschetta with a crispy bread. I also left some options depending on if you're using this as a side dish or an entree, or if you're not a big fan of onion, for example.

Bruschetta Salad

Serves 2-4

Ingredients
salad
4 ripe, roma tomatoes, de-seeded and diced
1 clove garlic, minced
1 Tbsp fresh basil, chopped
2-4 cups of fresh spinach, washed and torn
1/4 cup feta, crumbled
1-2 Tbsp red onion, diced
1 Tbsp olive oil
1 tsp balsamic vinegar
salt and pepper, to taste

croutons (optional)
1 1/2 cups bread, cubed (I used leftover multigrain artisan bread)
1 Tbsp olive oil

Directions
1. Croutons: Heat oven to 375F. Drizzle 1/2 Tbsp olive oil on baking sheet. Add cubed bread, drizzle remaining 1/2 Tbsp and lightly toss to coat. Make sure bread is spread out. Place in pre-heated oven and bake for about 6 minutes, or until golden brown. Check and shake pan about every 2 minutes for even cooking.
2. Let croutons cool.
3. Combine salad ingredients and toss. Add olive oil, vinegar, salt, and pepper.
4. Mix in croutons and serve.

So simple, so flavourful, and a recipe I will definitely be making again!
See below for other garden inspired ideas and enjoy the rest of your summer! 


Steph Langdon, RD
something nutrishus